Drawing Practice - The Definitive Step-by-Step Guide (2024)

This article takes a step-by-step approach to creating an effective drawing practice routine. It’s based on many years of experience drawing.
Following the 7 steps, you’ll learn the key epiphanies to practice drawing effectively and creating a routine that improves your skillset.
By the end of the article, you’ll know exactly what to work on, and how to work on it, with drawing practice exercises tailored to you.
It’s a 5000-word beast with many images. To jump around you can use the table of contents below, as well as the “back to top” buttons throughout the article.
Why This Guide Matters
Most drawing routines fail not because you’re untalented, but because the practice isn’t structured. Practicing without understanding your weaknesses or without a clear focus leads to wasted hours and slow progress.
By following the 7 steps in this guide, you’ll:
Learn how to identify your true weaknesses in drawing fundamentals
Build a practice routine that consistently improves your skill
Train your vision, hand, and materials effectively
Understand how to design your own references and draw from life
This guide will give you a clear blueprint for effective practice, so you always know what to work on next.
Step 0: Setting Yourself Up For Long-Term Drawing Success
Drawing is hard, and to become great at drawing, you need to turn it into an enjoyable, fun habit, that you’ll happily pursue regularly over months and years.
You can get small wins in weeks, and make noticeable improvements in months, but real progress takes years (as with everything in life).
How to Make Drawing An Enjoyable Long-Term Habit
The most common reasons that prevent beginners from drawing regularly are:
“I don’t know what to draw”
“I’m busy and can’t find the time to draw”
“I don’t know what and how to practice”
To make drawing a habit you need to address these head on. Let’s tackle them one by one:
Excuse 1: “I don’t know what to draw”
Not knowing what to draw means you have not invested enough time into finding masterworks and drawing references you love, building a library around those, and designing your environment such that you regularly see them throughout your day.
It’s as simple as that!
The great news is, with a bit of preparation you will never be in that situation again. Here’s how:
Tip 1: Collect Masterworks
Build a collection of master paintings and drawings you love, digitally or through books.
All you need is ONE artist name who’s style you love. Then use ChatGPT to find more with a similar style. Below is a prompt I used to find 5 artists similar to John Singer Sargent.

Once you have a few names, start google their work and save the ones that speak to you in a folder on your laptop. Here’s an example of mine:

Who I study changes all the time. Right now it’s Chris Legaspi, who I learned a lot from online and in person.
Next time you don’t know what to draw, you have a collection of master paintings and drawings that are waiting to be studied by you (I’ll show you how to study them later in this article).
Tip 2: Take Reference Photos With Your Phone
As you go about your day, make it a habit to take photos of things you’d like to draw. Just become aware of what attracts you visually. Then later upload them to your laptop to use them as a reference.

Photo reference taken from a holiday in Vietnam. You can adjust the contrast of your photos to help see the value pattern.
See interesting forms, shapes, colors, and designs? Take a photo and study it later with your pencil!
Drawings of photos you made are truly your art, as you make all image-making decisions from start to finish. It’s very freeing once you start doing this and will motivate you a lot to draw.
Tip 3: Bookmark Figure Drawing Reference Sites
If you have life figure drawing classes with real models near you, that’s of course the ideal. But even if you do, thanks to the internet, figure drawing reference sites provide you with an unlimited amount of practice material.
Two figure reference sites I use are:
While those free ones are great, I recently started using a very high-quality reference site called Dynamic Muse. It comes at 3$ per month, but the references have a great sense of aesthetic and are a joy to draw from.

Drawing from amazing references like this one from DynamicMuse is just way more fun.
There are many more sites like these, so google around and bookmark them. That way next time you want to practice figure drawing or get some quick portraits in, it’s just a click away.
Excuse 2: “I’m busy and can’t find the time to draw”
Not knowing what to draw is already a time sucker, which you tackled in the previous section. That should partly help with this excuse.
But on top of that, I recommend the following:
Tip 1: Have Your Materials Prepared At All Times
If none of your pencils are sharpened, your paper is in another room, and you forget where your eraser is…. then starting to draw can feel like a big mountain to climb.
Instead, make sure you have a set of materials ready at all times. Below is an example of my current set of materials. A lot of thought went into those:

2 Pencils
I can achieve a nice tonal range with just two pencils, e.g. a B and a 5B
Tonal control is more important than the tonal range for realism
A pencil holder
Can help using a Backend Grip (more on that later), to create very light tonal values
2 Mono erasers with different shapes
I use those to draw highlights or halftones on areas that already have graphite tone on them
Kneaded eraser
Another tool I can use to draw and model lights
Long lead pencil sharpener
Sharpens the pencil to a long lead, so you can use the overhand grip for soft tones
Perfect for traveling
Leuchturm sketchbook
Smooth paper, great for pencil work
Stiff back so you can draw on you lap
A Lamy pen (black)
Great for line drawings
Combines well with pencil
Just with these materials, I can create very polished drawings. I regularly update and rearrange this set to ensure it reflects my current priorities.
So, prepare your materials! Make sure they are prepared, and inspire you to get drawing.
Excuse 3: “I don’t know what and how to practice”
This is a big one, and the rest of this article will tackle this excuse in a structured way so you’ll never think it again.
There are however 2 very effective baseline habits I suggest you adapt today. I found those to be very effective.
Baseline Habit 1: Place A Masterwork Where You See It Regularly

Boldini and Michelangelo on a coffee table.
By placing a master painting or drawing somewhere obvious, you will regularly see it throughout the day, and you won’t be able to help yourself but look at it and wonder “What makes this painting or drawing so effective?”
It will start generating ideas that develop the “vision” for your art.
Baseline Habit 2: Place Your Most Recent Drawing Where You See It Regularly
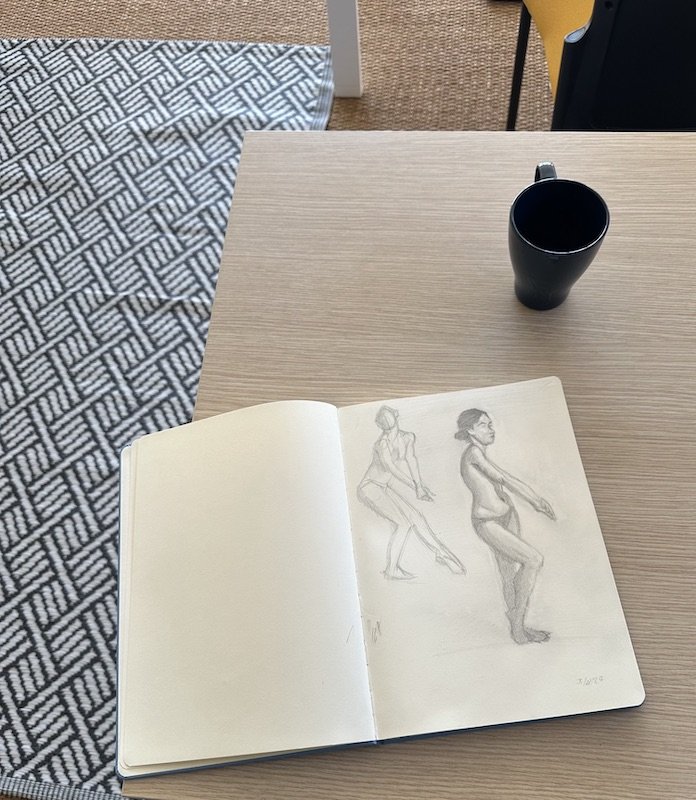
My most recent drawing, lying around where I can see it often throughout the day.
When you see your drawing regularly throughout the day, even when you don’t draw, your mind will start thinking about what you did well, and what isn’t working so well in this drawing.
With those 2 habits combined, you will be:
1) Exposed to excellent art regularly throughout the day
2) Exposed to your own art regularly throughout the day
And as a result, it will set your head in the right place of where you want to go, and where you are today.
In summary, here’s how you make drawing an enjoyable long-term habit:
Build a growing collection of master paintings and drawing references you love, and make your current favorites visible in your daily life, so you regularly see them, admire them, and take time time to see what makes them so great.
Make your most recent drawing visible in your home, such that you see it several times per day. Make it a habit to ponder on what you did well, and what could have worked better. What would you do differently, if you’d redraw it now?
Build a material stack that inspires you, that you love, and that allows you to create finished work anywhere, with short setup time.
Ok, Step 0 is done, let’s get into the meat of the article!
Step 1: Fundamentals Review: Identify Your Weaknesses
Any skill has fundamental building blocks that you return to again and again to get better. In drawing, you can categorize the fundamentals as follows:
Linear Mark Making
Measuring
Gesture
Form in Perspective
Shading Form in Perspective
Edges
Subject Knowledge (Anatomy)
Material Mastery
Composition
Design
If the idea of drawing fundamentals is entirely new to you, I once again recommend reading my guide on the fundamentals of drawing, which covers each fundamental drawing skill in detail.
If at least some of those ring a bell, I suggest you continue reading for now.
Why the Fundamentals Are So Important
The fundamentals build the baseline of your skill pyramid. The higher you want to build it, the wider your foundation needs to be.
The answers to almost all your drawing struggles lie in revisiting the fundamentals and deepening your mastery and understanding of them.
To get advanced at drawing you need to get advanced at the fundamentals.
Focusing on your biggest weaknesses in the fundamentals will bring the greatest overall advancement in your drawing skills.
While the thought of revisiting basic concepts might be sobering, the bright side of it is that you will always know how to improve your drawing skills from now on.
Of course, you can’t work on all of them at the same time. That’s why you have to identify weaknesses in your fundamentals and focus on those for some time. Here’s how:
Drawing Exercise 1.1: Rank Your Fundamentals
Take the list from above, and rank yourself for each on a scale from 0-5.
5 - Out of all skills you feel most confident in that one
0 - You have never heard of it
1 - You have practiced it a little bit, but not much
2,3 and 4 - Somewhere in between, don’t overthink it
Notice this scale is relative to YOU. Don’t compare yourself to others. 5 simply means it’s the skill you feel best at, compared to all other skills.
To give you an example here’s how I’d rank my skillset:

Drawing Exercise 1.2: Pick A Focus For Your Drawing Practice
Once you rank your proficiency in the fundamentals, it’s time to pick a practice focus.
From the list above it’s clear to me I need to work on my understanding, perception, and execution of edges, and tonal skills in general.
It’s just a topic I haven’t spent as much time on.
Drawing linearly, and the skills that go with it (measuring, gesture, shapes, anatomy) I have spent more time on, so I feel more confident in them.
As a result, my greatest weaknesses, and the focus of my drawing practice, are:
Edges (Main priority)
Value design
Tonal mark making
Shading form in perspective
Composition with a focus on tonal arrangements
How to use my materials optimally for tonal drawings
Make sure to go through the process for yourself, before going to the next step.
Summary Step 1: Review and rank your proficiency in the fundamentals. Focus on your greatest weakness for the greatest skill improvements.
Step 2: Analysis: Understand Your Weaknesses
This is an important step, but luckily one you’ll find the most easy. It’s about conceptually understanding your weakness.
Simply put: Study the topic like you would a subject in school.
While drawing involves training your vision, your hand, and material mastery, an analytical understanding is still important and comes first.
I’ll show you how in a second, but let’s first understand:
Why Understanding Your Weakness Is Critical
Take edges as an example. What actually is an edge?
Well, it’s the result of light hitting a surface, and depending on the curvature of the surface, how the resulting light/shadow pattern looks on the object. The faster the surface turns, the sharper the edge, the slower it turns, the softer the edge.
That is useful to know.
When you draw, it allows you to think through problems. Does the chest have a slow or fast curving surface plane? It’s relatively slow at the top, and somewhat faster at the bottom. That means the edge is softer on top and sharper/firmer at the bottom.
It’s critical with any fundamental to first understand it conceptually. Here are two exercises that help:
Drawing Exercise 2.1: Analyze A Master Work In Writing
Take a master painting or drawing you love, and take a page of notes on how the master used that specific concept you are focusing on.
Let’s take this painting by Maxfield Parrish’s “Mary Quite Contrary” and analyze his use of edges and tonal patterns.

My notes:
The sharpest edge is on the figure is between the black blouse shape and the creme-colored dress. It draws attention to the focal point of the painting, where your eye gets lost in the asymmetric shape arrangements within the figure and the face.
The edges on the face, and between the face and the hair, are very soft and subtle.
The sky on the top left has a relatively sharp edge between the blue sky and the white clouds, which gets softer and softer as the blue of the sky gradates lighter and lighter towards the center and bottom right of the image. It guides the eye from the top left back into the center and bottom right of the image.
There is a strong sharp edge between the watering can and its surroundings, which grounds the eye and catches it from leaving the picture on the bottom right. It makes us jump back to the main black shape on the blouse, where we get lost again in the arrangement of shapes on the figure.
The curvature of the background area at the bottom guides the eye back towards the figure and catches it from leaving the image at the bottom left. That effect is created by the sharp edge between the bright lake and the dark land piece around it.
Drawing Exercise 2.2: Revisit Classic Drawing Instruction Books
If you are like me and have a collection of books on drawing, make the time to revisit the ones that write about your weaknesses.
When it comes to edges, revisiting the classic instructions on how to model the form of a sphere and a cube, was well worth it for me.

Practicing Edges by studying the classic box and sphere.
If you don’t have books on the specific area you are struggling with try and find some. Video tutorials can also be great.
I’m writing an article on my favorite drawing books soon and will link to it here when it’s live. Until then, do your own research, and keep revisiting classic instructions!
Summary Step 2: Get a deeper analytical understanding of the skill you are focusing on, by analyzing masterworks in writing and revisiting classic instruction books.
Step 3: Perceptual Shift: Train Your Vision
Just like playing a musical instrument requires you to train your ear, drawing requires you to train your vision.
I know for a fact that when I started drawing I did not see angles, values, edges, gesture, & composition. I wasn’t even aware those visual concepts existed.
For each skill, once I learned it existed, and understood it conceptually, there was a time when I had to try and “see” the concept.
It takes time for your vision to evolve, and how well you can draw is directly related to what you see.
Why training your vision is key:
It’s important to understand that drawing is NOT just a skill of training your hand or learning cool techniques with some pencils. It’s a part of it, but useless without training yourself to “see”.
To get great at drawing, you need to continuously train your vision.
Once you realize this, you can directly focus on training your vision, and progress much faster.
Here’s the best way I know of to train your vision:
Drawing Exercise 3: Master Studies
Probably the most effective exercise to train your vision is to do master studies.
Masters put a lot of thought and work into making great decisions to create an effective picture. By studying them you will learn and “feel” what they did, and get exposed to the pinnacle of visual thinking.
Simply take one of the master paintings you love that you’ve been collecting from Step 0, and do a free-hand drawing. If you’ve never done these, you can also start by tracing it using transparent paper.

Studying the value composition, gradations and edges of Maxfield Parrish.
There are different variations of master studies. You can try and copy them as exactly as possible, or only focus on specific areas:
Shapes
Forms (e.g. cross contour studies)
Gesture
Feature design
Color
etc.
Any drawing fundamental you struggle with, you can improve on by studying masters from the past. To go deep into this topic, check out my Definitive Guide to Old Master Studies.
Summary Step 3: Do freehand studies of master paintings and drawings. Keep your drawing practice focus in mind.
Training your vision is critical to elevate your drawing skills and taste. If you want guided exercises that show you exactly how to train your vision, the Foundations of Realism Course demonstrates this step-by-step with videos and feedback.
Step 4: Hand Execution: Train Your Hand To Deliver
Of course, once you understand a drawing concept, and you made some progress in seeing it, you eventually need to be able to execute it using your hand.
While the materials add another layer to consider (we’ll cover it in the next step), your hand execution skills are something you have to practice in an isolated manner.
Why Training Your Hand Matters
By training your hand to make marks, your mark making quality dramatically improves, which improves the look of your drawing.
A trained hand that executes well on your intent means fewer mistakes and more confident drawings.
Some concepts require you to learn to move your hand in new ways. So you HAVE TO train your hand, to even be able to use that new skill.
It’s fun and you can do it anywhere.
Ok, now that you know why training your hand matters, let’s get into the exercises.
A Note On Mark Making Exercises
Please keep the following in mind: What mark making exercises you do depends on the skill you struggle with.
Struggle with perspective? Knowing how to draw long straight lines in all kinds of directions will be key.
Struggle to draw shapes? Practice drawing clear shapes.
Struggle with tonal drawing? Practice drawing value scales.
I covered mark making in detail in my fundamentals guide, under the linear mark making and tonal mark making sections. For a more systematic explanation, do check it out.
Here my goal is to introduce you to the main grips and how they relate to training your hand to deliver. Let’s get into it!
Drawing Exercise 4.1: Writing Grip

The writing or tripod grip is great for sharp edges and linear marks.
Practice straight, curved and S-lines
Practice basic shapes
Practice laying patches of tone
-> Try varying the values of each.
Drawing Exercise 4.2: Overhand Grip

The overhand grip is best for tonal drawing, firm to soft edges.
Practice straight, curved, and S-lines
Practice basic shapes
Practice laying patches of tone and gradations
-> Try varying the values of each.
Drawing Exercise 4.3: Back end grip

The Backend grip is great for light measurement lines and building up light tonal patterns.
Practice laying down very light patches of tone and gradations, at different values
The pictures above show you a range of marks you can practice in those three grips. Start with 10 minutes a day of mark making practice, and evaluate your progress after two weeks.
You’ll find progress can be quite fast!
Summary Step 4: Train your hand with specific mark making exercises to improve the quality of your marks, and thus your drawings.
Step 5: Material Experiments: Make Your Tools Work For You
Once you understand a concept in more depth, trained yourself to “see it”, learned how to execute it with your hand, then it’s time to remember the connection between you and the drawing:
Your materials, meaning your drawing tool and your drawing surface.
Why Material Experiments Are Important
The deeper you understand what’s possible with your materials, the more they work for you instead of against you
Understanding materials is critical to getting great results consistently
Knowing tricks and techniques for your materials helps with speed and execution
Choosing the wrong materials for a drawing can set you up for failure from the start
Drawing Exercise 5.1: Material Experiments
While you can learn a lot from other artists, materials are a very personal thing, and over time no one but YOU can figure out how to make the most of your materials.
The easiest way to advance your understanding is to do material experiments.
Here are some experiments I made on how to create edges with a pencil on white paper.
Material Experiment 1: Grip And Blending Combinations
In this experiment, I drew patches of tone with a tripod, overhand and backend grip, then blended those patches with my finger.
Blending essentially means smudging the tone by wiping it back and forth. You can use a tissue, brush, or finger (like I did here).
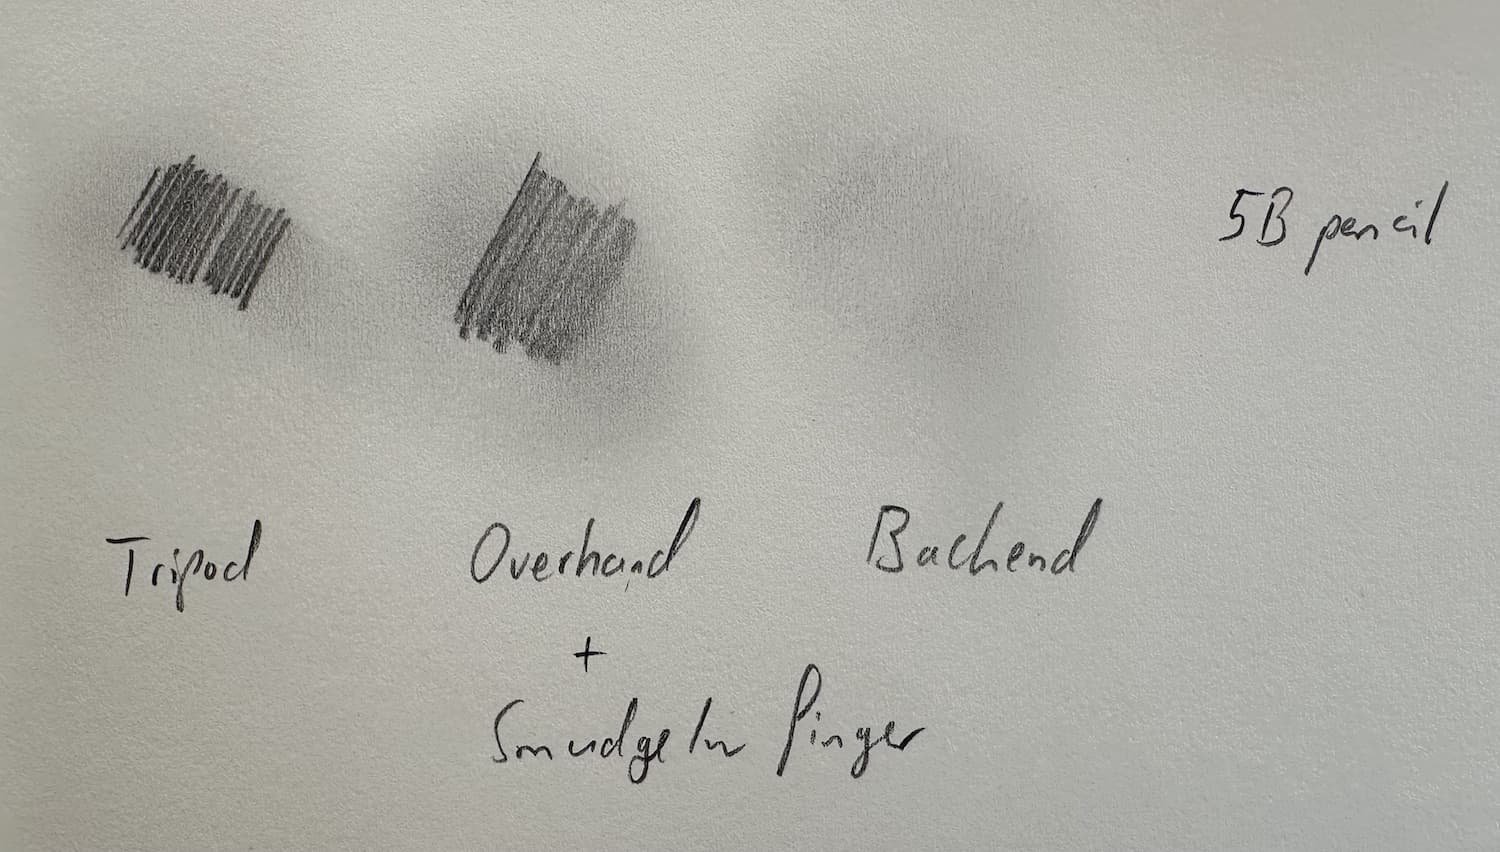
Which grip lays the best base for soft half tones?
As you can see, with the Backend grip I was able to create super light tones, that I could blend with my finger to a point where you don’t even see the lines anymore.
Main takeaway: The backend grip is great for soft and lost edges!
Material Experiment 2: Eraser Mark Variety On Blended Background
Erasers are another useful tool for creating edges and other effects on a base of graphite tone.

Testing different eraser marks on a smudged graphite background.
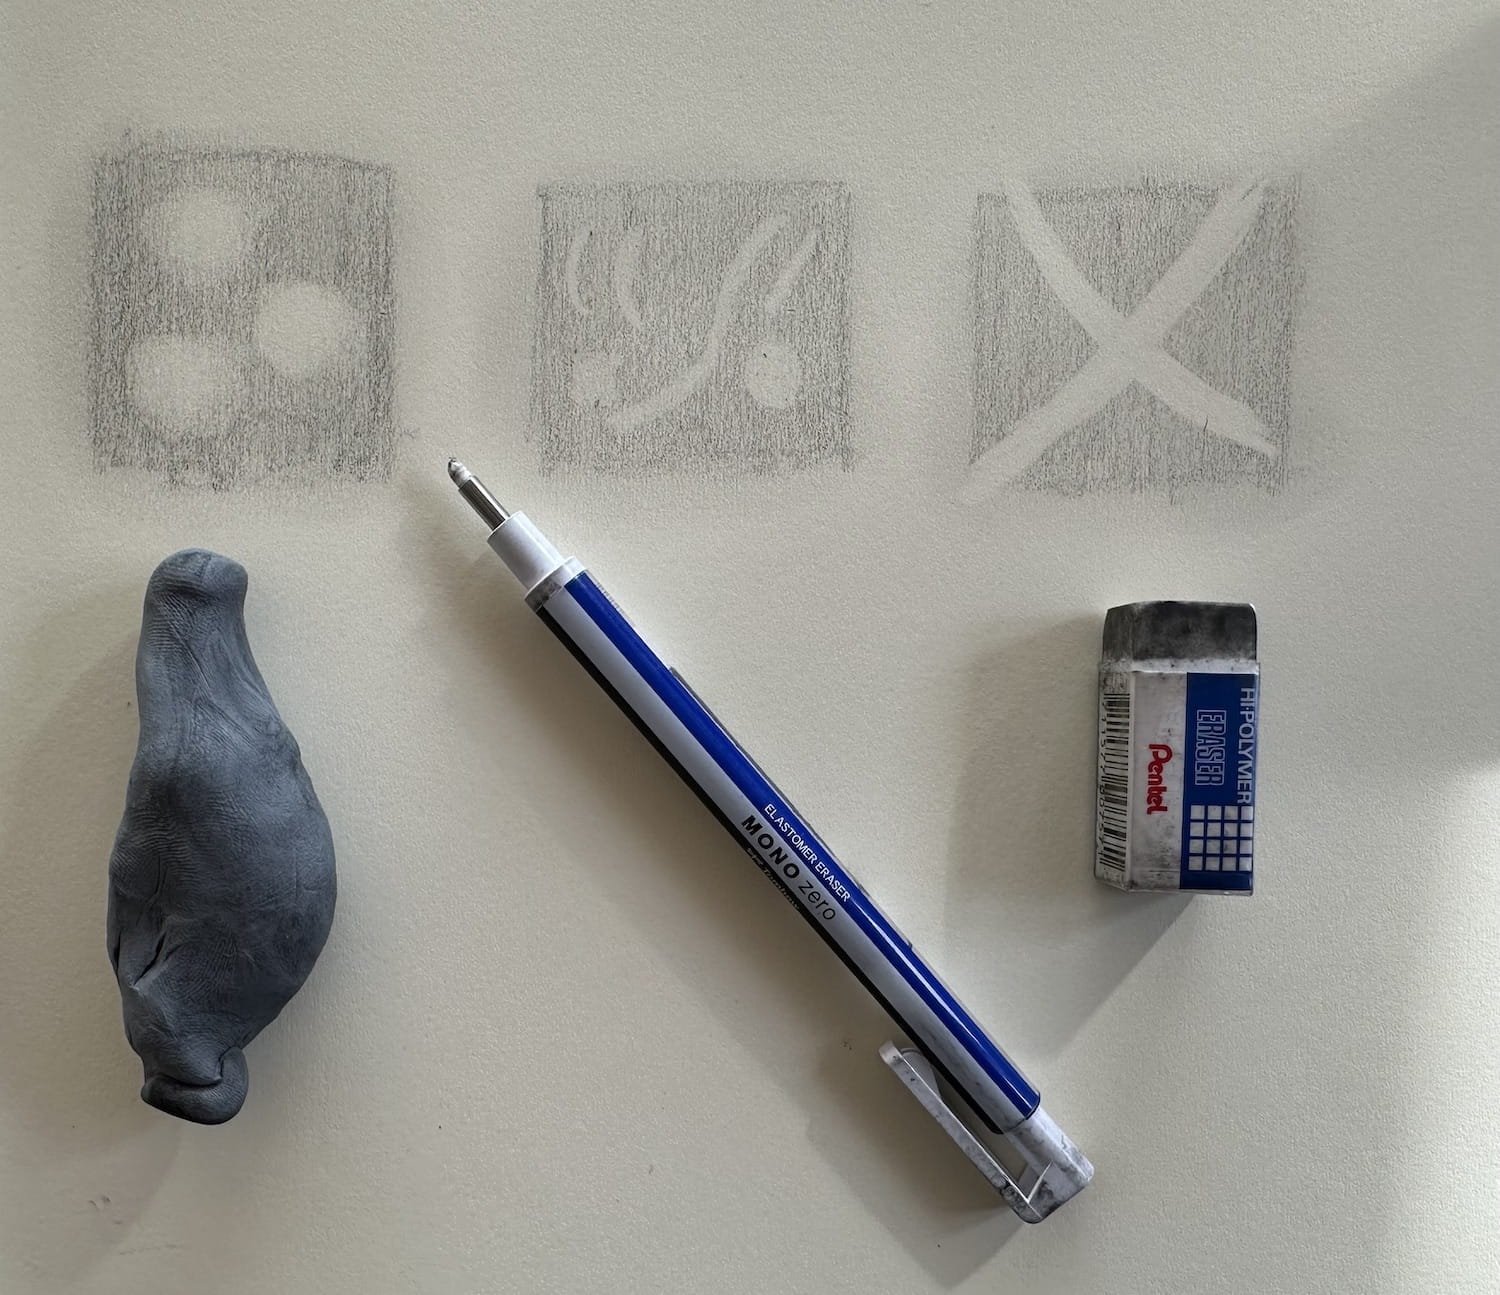
Which eraser mark would you use when?
As you can see the kneaded eraser created patches of light with soft edges.
The Mono zero erase in the middle allowed me to create detailed light shapes, perfect for finer highlights on a face. Here the edges are slightly sharper than with the kneaded eraser.
The square pentel eraser took off the graphite very cleanly and broadly, creating the sharpest edges, and thus is great for erasing bigger shapes, for example on a background.
Summary Step 5: Experiment with materials to make them work for you, instead of against you. E.g. drawing on toned paper versus white paper, and anything else you can come up with.
Step 6: Design Yourself: Life Drawing And Own References
At this point, you’ve practiced your focus skill from all angles.
You studied it through master studies, in isolated mark making exercises, figured out how to use materials to your advantage…
…but using a concept when doing your own drawings is a different ball game.
Why Using Your Own Reference and Drawing From Life Matters
When drawing from master paintings or photos other artists took, those artists made important design decisions for you.
When drawing from your own reference or from life, YOU need to make those design decisions, which is harder than just studying/copying.
This step is also exciting. You practice applying your newly trained skill to your own art.
It’s about becoming self-reliant, and being able to use that newly acquired skill independently.
Drawing Exercise 6.1: Draw Your Own Reference Photo

Photo reference from a recent trip to Vietnam and my drawing study of it.
Simply take a photo of a subject you are excited to draw.
It can be a portrait of a family member, a still life or a landscape. Take time and put thought into it though. Ideally you have a photo that has strong lighting.
Then upload it to your laptop and draw it. Particularly focus on the skill you’ve been focusing on.
Using a photo is easier than drawing from life, and allows you to focus learning to design yourself without time pressure.

Another drawing from a my own photo reference. I practiced soft gradations with a backend grip to create a soft edge on the face.
Drawing exercise 6.2: Draw From Life
Ok, now that you applied the new skill to your own reference drawing, it’s time to draw from life.
If you have access to live models, that’s great! If not, set up a still life, go out to do a landscape drawing, or go to a coffee shop at a busy place (train station, markets), and do some sketches.
Drawing from life is harder, as you are under time pressure, and the subject can move (unless you do a still life).
You also have to translate the 3D world into the 2D picture plane, which adds another layer of complexity.
That’s why you practice it last: It’s the most difficult.
Summary Step 6: Draw from your own references and from life. Design for yourself, and use your newly acquired skill in action.
Final Step 7: Process Integration
Whenever you draw, you follow a drawing process, whether you notice it or not.
In fact, many beginners are not even aware they have a process. Or they might change their process unknowingly, resulting in bad drawing days and motivational slumps.
Here’s why it matters:
Awareness of your process creates consistency.
Tweaking your process gets you consistently better results over time.
Some skills, like edges, might be relevant at specific stages of the drawing. If you use them at the wrong stage, they can dominate and throw off the drawing.
Drawing Exercise 7.1: Write Down Your Current Process
This is a great exercise, that helps you gain awareness of your current drawing process.
Maybe you realize you have a few processes. That is also fine. The point is to write down what you currently use.
For the longest time, my process looked like this, and I didn’t even realize it:
My Old Drawing Process
Immediately start drawing
Measure lines, distances, angles
Draw very slowly and carefully measure, erase
Slowly build up value by squinting at the subject, then matching that value on my drawing
That style of drawing was very observational, slow, and I was essentially copying the reference like a machine.
Over time I tweaked that process to include concepts like shape design, gesture, composition, and so on and so forth, which created better results and was more fun as well.
If you want to go deeper into this topic, check out my definitive guide to the figure drawing process.
Drawing Exercise 7.2: Write Down A New Process Incorporating Your New Skill
Now that you know your current process, write down a new process, that includes what you have learned from your study sessions on your weakness.
Below is my current process with changes I want to make based on the drawing practice focus of this article (edges):
My Current Drawing Process With New Steps In Bold
Look at subject for a while, notice what excites me about it
Decide what my goal is for the drawing
Study of specific parts?
Study of specific concepts?
Final piece?
What’s the story?
Decide on frame and composition
Placement of drawing in relation to borders of the page
Shape of the frame (square, rectangular, circular)
Arrangement of shapes
Decide on ideal materials
Pen for stylized line, or graphite for polished high-key drawings, or a mix?
Colored and white pencil on toned paper for strong value contrast?
Decide on value range and design
What will lightest light and darkest dark be? What materias to use to get that range?
How many values will I use?
Are there gradations?
Start measuring, and putting down major shapes and lines.
Consciously design shapes and lines with gesture
Keep refining shapes until the foundation is tight
Loosely map out the separation between light and shadow
Already indicate the edge quality (hard, firm, soft, lost)
Lay in first light wash of tone in the lights with a Back End Grip. Lay in a wash of darker tone in the shadows with and Overhand Grip
Decide on darkest darks and put those in with a Tripod grip. Don’t make them as dark as possible, so there’s room to do so later if needed (In case I make halftones too dark by mistake).
Start putting in modelling factors (core shadows, occlusion shadows, cast shadows, reflected light, halftones, highlight)
Consciously design modelling factors with surface planes and cross contour marks
From there use intuition to decide
How dark to make the drawing
How far to model the drawing
Which areas stay sketchy, which get refined
What to keep in the drawing, what to leave out
As you can see my process became much more complex compared to back in the days, and I constantly adapt it based on these focused study periods of my specific weaknesses.
Drawing Exercise 7.3: Try the New Process and Tweak It
Time to follow the new process. Use another photo reference or draw from life!
Final Thoughts
That’s it, I hope you got some clarity on how to structure your drawing practice!
You can already start applying these 7 steps to improve your drawings and make your routine more effective.
If you’d like help turning this guide into a fully structured, repeatable practice — with guided exercises, video demonstrations, and personal feedback — that’s exactly what Foundations of Realism does. It builds directly on the ideas in this article and shows you how to train each skill as one connected system for faster, more consistent progress.
You can check it out below!
Until next time,
Felix