How To Draw Anything - The Definitive Drawing Process Guide (2025)
This is a comprehensive guide on how to draw anything using a simple 4-phase drawing process:
Sketching
Composition
Lay-in
Rendering
You’ll see exactly what to do in each phase, as I demonstrate how I got to this final drawing:

If you are confused about how to draw anything, this article will bring you clarity.
After reading it you'll understand exactly how to draw anything beautifully with consistency, using a simple drawing process.
Important note before we begin:
You can watch an in-depth video version of this tutorial on YouTube.
It’s a full recording of the drawing you see in this article, from start to finish, with real-time explanations as I draw. The video shows every single mark I make.
My recommendation: Read the article first, then watch the video. They are not perfect replicas of each other, you’ll find unique nuggets of knowledge in each.
This article has 2 parts:
Part 1 covers the step-by-step process of how to draw anything using 4 phases.
Part 2 covers how to tailor the drawing process to yourself using 3 principles.
You can jump directly to sections using the table of contents below, as well as the “Back to Top” buttons throughout the article.
Part 1: How To Draw Anything
Part 2: How To Create Your Own Drawing Process
Part 1: How To Draw Anything
Phase 1: Sketching
Before starting a longer drawing, it’s very helpful to do a sketch.
A sketch is a short drawing of roughly 5-20 minutes, that helps you:
Identify areas that you find beautiful and want to focus on in your final drawing,
Identify areas that you find difficult to draw, and find visual solutions for those areas.
Sketching should be fun, freeing, and exploratory.
Sketching Materials For Beginners
First, a note on sketching materials.
I recommend you start with a combination of ballpoint pen and graphite or colored pencil. Here’s why:
The ballpoint is “unforgiving” as you cannot erase it, and also allows you to get dark darks quickly. Every mark you make forces you to make a clear commitment to a line, shape or tone.
Graphite or colored pencil is great for quickly adding soft tone to your sketch. You’ll see how to do that in a second.
Now that we covered materials, let’s get into the step-by-step of sketching.
How To Sketch Step-By-Step
The point of sketching is to capture your emotional and intuitive response to the reference.
The easiest way is to just jump right into it. Start exploring the reference through drawing.
Whenever you find an area that is difficult to draw, take some time to figure it out, by making separate sketches of just those parts.
Below you can see how I start the sketch using ballpoint pen.

Jump right into the drawing and “figure it out” using a ballpoint pen. Voilà, you’re sketching!
As you can see the pen creates very decisive lines, that build the drawing quickly.
The point is not to be perfect, but to practice, explore, and draw intuitively.
Rendering A Sketch
Once you got the line drawing in pen, it’s time to add some tone.
As you add tone, remember two tips:
Use an overhand grip. This allows you to make broad tonal marks.
Try and design the tone in a way that creates a focal point.
The point is not render the drawing to perfect realism - remember, it’s a sketch!
Instead it’s to explore the light and shade dynamics, and get an initial idea of where the focal point should be.
Below you can see that how I shade the sketch using a Prismacolor Verithin black pencil.

Using value in your sketch prepares you for the rendering of the final drawing.
As you can see a lot is left unfinished, but the spirit of the pose is captured by the sketch.
That’s it!
Why Sketching Is So Important
Sketching as a preparatory step will tremendously improve your longer drawings.
Here are three reasons why:
Why To Sketch Reason 1: Capture Your Emotional Response

A quick sketch of my wife when she was pregnant.
Sketching allows you to explore the reference in an intuitive, emotional, visual way.
This intuitive response is what got you excited about drawing the reference in the first place, so a sketch allows you to fully focus on what “hooked” you, and capture it.
Your sketch might not have perfect proportions, but it will capture your raw response. Once captured, you’ll have a much easier time infusing your longer drawings with that emotion.
Why To Sketch Reason 2: Solve Visual Problems In Advance

A quick sketch of a Loomis drawing. Making sketches of master drawings helps you absorb their design.
No matter how skilled you are, every drawing has parts that you struggle with.
Maybe the hand is in an awkward position. Or the leg is at a difficult angle with foreshortening (like in this drawing).
Sketching allows you to explore those difficult parts of the drawing, and find solutions.
It might be a decision about editing out certain parts that don’t help your final image. Or you find a way to simplify a bodypart with a form.
By solving these problems in advance, you avoid being hindered by them when doing a longer drawing.
Why To Sketch Reason 3: Warming Up Your Hand & Mind
Last but not least sketching warms up your hand eye-coordination.
It allows you to shake off any rust, losen up your hand, and stretch your drawing muscles.
After having done your sketch you’ll be warmed up and ready start your long drawing with confidence.
Phase 2: Composition
The sketch is done and you are ready to jump into the final drawing?
Not yet!
There’s yet another preparatory step, that will tremendously improve your final drawing, if you just have the patience to complete it.
The composition!
What Is A Composition?

A small compositional study helps you avoid image making mistakes down the road.
A composition is a small, simplified representation of your final image. The goal is to plan:
Where the subject is placed in the image
How the image is framed (Rectancle, box, circle, etc)
How the major shapes of the subject and the background are arranged
How the light and shadow pattern reads (called a 2-value read)
What the focal point is

My simple game plan for this drawing.
In the composition above I chose the side of the hips as a focal point of the final drawing. I design the background with curved lines to create a circular eye flow through the image, that brings the eyes back to the side of the hips again and again.
Composition is a deep topic, but if you just do those simple things mentioned above, you’ll be light years ahead.
Alright, you figured out your subject by sketching, and you planned your image by composing.
You are ready to start the actual drawing!
Phase 3: Lay-In
In phase 3, you lay in the drawing. Here’s what a lay-in means:
You create a line drawing that describes your final image
You try to follow your composition plan
You try to balance measuring & accuracy with designing shapes
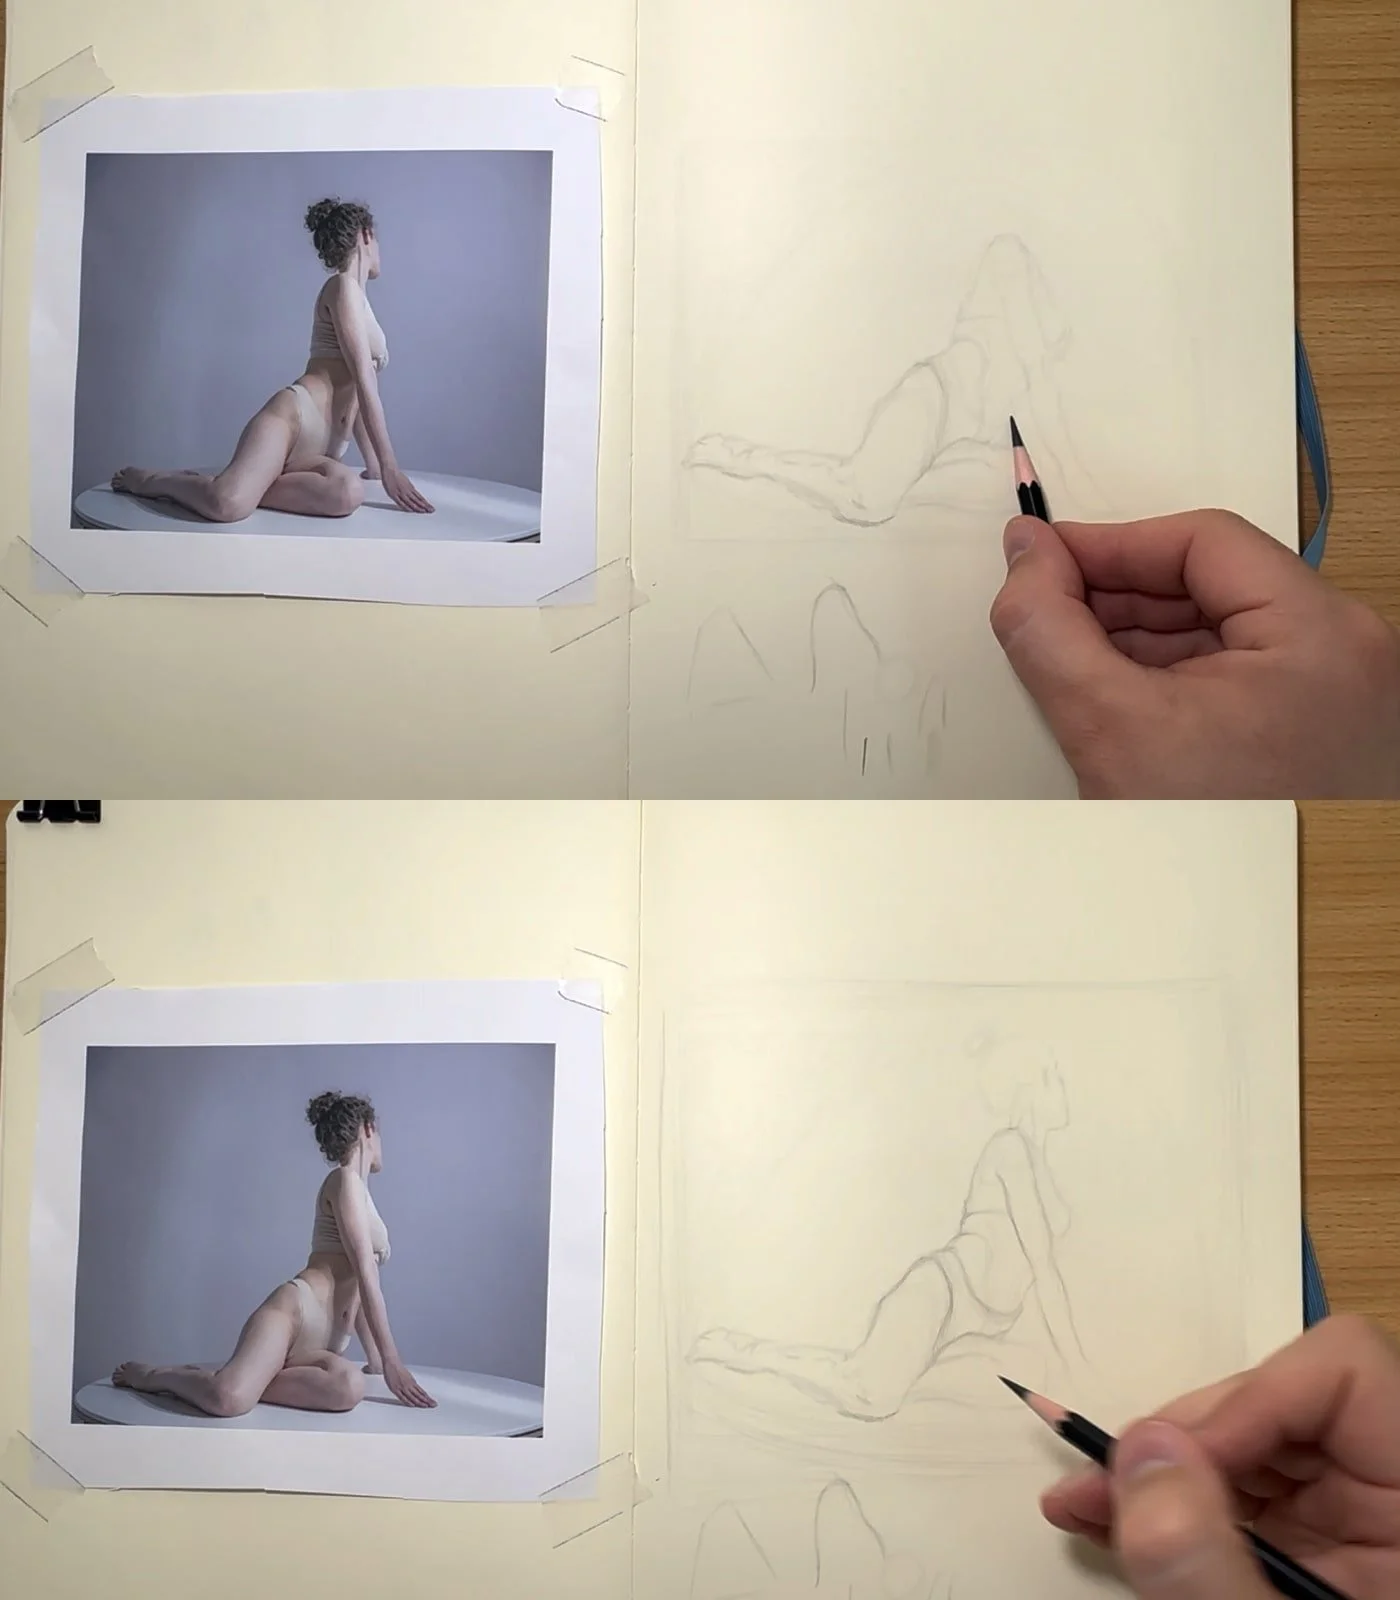
Lay in your subject with light lines. Pay attention to the frame of the image.
Tips For a Successful Lay-in
Use a light pencil (E.g. HB or B) and keep marks light and soft. Light soft marks are easy to erase. You will have to make corrections throughout this phase, so plan for it.
Establish your frame early! The frame makes you aware of the limits of the image.
Establish the background early as well. The more information you have on paper, the easier it is to be accurate. By adding information in the background it becomes much easier to accurately judge distances.
Regularly step back, take a break, and look at your drawing from far away. What sticks out as wrong? Take mental notes of it, then go back to the drawing and correct.
Focus on BOTH accuracy AND design.
End of Lay-in
By the end of the lay-in phase you should have a mostly linear drawing, with accurate proportions, that follows your compositional plan.
Here’s how a completed lay-in can look like:

How the end of the lay-in phase can look like.
Personally, I prefer to have some light rendering in the lay-in phase, to establish the focal point and reinforce the composition. It also helps with judging proportions, accuracy and getting a sense of form.
Some artists are more strict though and stay purely linear in the lay-in phase. Find what works for you!
Phase 4: Rendering
Now it’s time for the fun part:
Shading your drawing, also called rendering!
The goal in this phase is to make your drawing feel three dimensional, atmospheric and realistic, using shading techniques.
Here are my tips for successfully rendering.
Rendering Your Drawing Tip 1: Build Up The 2-Value Read
One of the most important rendering concepts is the 2-value read.
You might not realize it yet, but any great image you look at has a strong 2-value read.
Take this Master painting by Velazquez as an example:

Velazquez was a master of the 2-value read.
You can see that the 2-value version of the painting reads clearly, and has a very direct design. This is the type of clear 2-value design that you want to aim for in your drawings.
The 2-value read has a huge impact how easily your eyes can consume the image.
If the 2 value read is unclear, your image will feel unclear.
If the 2-value read is flows well, your image flows well.
You can think of it as a short-cut, that brings clarity to your drawings.
Here’s how I build it up in the drawing:

Aim for the 2-value read first. You’ll be surprised how far it takes you in the rendering process.
I build up the background of the image with the colored pencil.
I use a make up brush to rub the graphite into the paper, which makes the tone more uniform. Uniform tone (that has no white paper patches showing through), is much easier for your eye to “read”.
As the background darkens I keep stepping away from the image and squint, to see how the 2-value read looks. I look for areas where the 2-value read is unclear, take note of them, then go back into the drawing.
I use a kneaded eraser to lighten areas that should be light.
I wash rinse repeat the steps above until I have a crystal clear 2-value read that I’m happy with.
Rendering Your Drawing Tip 2: Build Up Form With Cross Contour Marks
By now the background is built up, the 2-value design is established, and we got a nice base of soft, uniform tone.
Now it’s time to finally get into the “juicy” part: Rendering the form.
This is what beginners are often most excited by. Building that illusion of form on paper.
But I want to point this out to you, in case you haven’t noticed already:
“Realistic form almost automatically appears when you solve problems in the sketching phase, plan your composition, and establish a solid lay-in and 2-value design.”
Be diligent and work on these first, and you’ll find what comes now easy! Ignore them, and rendering will feel like an uphill battle.

Cross contour mark making is the key to rendering form.
The key technique for rendering form is cross contour mark making. You essentially imagine moving across the form as you draw it. The direction of a marks combined with its value creates the illusion of form.
I recommend starting with the contour (also called silhouette), and slowly gradate into the form. Just working on gradating the contour into the form already creates a volumetric effect.
I use a soft synthetic watercolor brush to soften my marks. I intentionally use cross contour marks even with the brush, to reinforce the flow of form in subtle ways. The brush softens the edges, which gives it a more realistic look.
I render from the focal point outwards. Spend most time refining the focal point, so it’s the most crips and sharp, and reduce sharpness as you move outward. That’s how our eyes naturally see.
It’s a constant process of refining the form using cross contour marks, softening with a brush, checking the 2-value read, and refining as you keep progressing.
Rendering Your Drawing Tip 3: Know When The Drawing Is Finished
Many students struggle with knowing when a drawing is finished, or even how to develop the drawing to that finish.
Here’s my simple tip:
Let the first impression be your ultimate judge.
Take a 5-minute break, step away from the drawing. Then come back and look at it with fresh eyes.
Where do your eyes go first? How does your image capture your attention, and where do your eyes flow next?
What parts feel too undeveloped, too unfinished? Is your eye flow obstructed by anything? Does anything feel out of balance?
Make a list of 3-5 things you notice, then return to the drawing and correct them.
Wash rinse repeat this process until the first impression when looking at the drawing is clear, and nothing is left that bothers you.

Keep stepping away from the drawing to judge the first impression and eye flow through the image. It’s done when you see nothing that bothers you.
Next, I add occlusion and cast shadows below the legs and the hand, which enhance the sense of form.
I notice the head is too underdeveloped, and build it up more. Notice that I don’t render it much, just enough to make the overall image read clearly.
Everything supports the focal point.
Final Drawing
Here is the final drawing:

You can see that the original compositional idea is there. The focal point is on the side of the hips, and the background, and mark directions create a visual eye flow that’s circular through the image over the focal point.
Part 2: How To Create Your Very Own Drawing Process
While the process described in this article is pretty universal, artists all have their very unique versions of this.
Some like to lay in using masses of tones (like a painter), others keep the lay-in strictly linear. The point was to give you one way that works.
Once you get familiar with using a process, it’s important to tweak it and make it fully your own.
This part 2 is for those who want to understand the principles behind any successful drawing process, and learn how to truly make it their own.
Drawing Process Principles 1: Increase Margin For Error

A smart process allows you to make mistakes without it being a huge deal.
We all make mistakes. We all get proportions wrong. We all make wrong marks. But if those marks destroy your drawings, it sucks!
A smart drawing process should help you:
Prevent making irreversible mistakes
Increase your chances for success
Ways to increase the margin for error in your drawings:
Sketching, to get errors out of your system and find solutions.
Composition, to prevent image making errors.
Lay in lightly using a soft pencil, so you can correct mistakes,
Step back regularly to see mistakes with a fresh eye.
Build up value slowly, to avoid making sharp marks that cannot be erased.
There are many more subtle ways you can weave this principle into your drawing process. Keep it in mind, and you’ll find more ways on your own.
Drawing Process Principles 2: Balance Realism With Emotion

A smart process allows you to capture the intuitive response to the reference.
Drawing is an emotional response to what you see. Make sure to capture that feeling.
Every drawing is a very personal creation, in which the viewer learns about what moved you when looking at a subject.
To make your drawings great, it’s important you capture this initial intuitive, emotional response you had when seeing the subject, while balancing it with realism.
Ways to capture your emotional response:
Make expressive sketches with expressive marks, to push the emotions you feel to an extreme.
Take a minute to ask yourself, what really attracts you to the reference, and what you want to convey in your drawing. Write down those ideas.
Chose a focal point and composition that enhances the emotion you want to the viewer to feel.
Chose materials that enhance that emotion.
Drawing Process Principles 3: Make It Fun!
Lastly, drawing should be fun!
Drawing becomes fun, when the process you use fits your temperament and character, and also creates the types of drawings you want to create.
The best way to come up with a process that suites you over time is to look at master drawings and paintings you love, and look for any information you can find on how that master drew (or painted).
You’ll find that there are many different ways to draw and paint. Animators draw differently to illustrators, draw differently to academic portrait artists…
To find out what works for you, look for people that draw like you want to draw.
Conclusion
That’s it!
You now know a drawing process you can use to draw anything.
As mentioned, I recommend watching the video version of this tutorial, to see it all in action.
Lastly, if you liked this article, then you’ll love my course Drawing Fundamentals In 7 Days. It’s the perfect course for beginners trying to learn drawing fundamentals in a smart way. It includes many drawing demonstrations that teach you the process as well.
That’s it, until next time!
Felix